Followers

Tuesday, July 30, 2013

Christmas in July


The web has gone crazy with Christmas in July so I just had to jump on the bandwagon. Thank goodness the heat has finally broken here in Colorado so I could get myself into the holiday spirit (no way could I have done this a few weeks ago when just sitting was making me literally melt!) This project was easy and inexpensive – my favorite kind!  All you need is:


  • Plastic 2 piece ornament (I used a star) – you can get these at most major craft suppliers
  • Alcohol ink (I used red & green, but really any combination would work)
  • Ultra Fine glitter (a neutral color or one that matches your alcohol ink colors)
  • Inkssentials Glossy Accents


I had this ornament in my craft room, just waiting for something to happen with it.  I had used it a while back to see if alcohol inks would stain it and I had used a bunch of colors to test; fortunately, the bulk of the colors were red based and that made my decision of what colors to use easy!   Also, when I used it as a test I didn’t cover the entire inside so there were “clear” spaces left. 


So I cracked the ornament apart and (AFTER I put my latex gloves on!!) put just one or two drops of red alcohol ink – I then used my finger to smear it around and cover what I wanted.  I did the same with the green alcohol ink, trying not to overlap the red ink too much.  Before the ink dried completely (and beware, it dries FAST) I sprinkled in some of the glitter, put the two sides of the ornament together and swished the star around to distribute some of the glitter around.  Lastly to seal the star together and make sure there was no where the glitter could escape (even thought I didn’t use that much and it seemed to be stuck on the sides) I painted the entire ornament with Inkssentials glossy accents.  This also gave the star a really nice shine; too bad I can’t get a really good picture of it, it looks much nicer in person.


That was it! I am planning on putting a bow on the top after I get my decorations out and can find a real ornament hanger (don't you love my hanger!?!) and can find my skinny silver ribbon - if you've seen it, please let me know! I really like the simplicity of the ornament and the coating of the glossy accents makes it shine so nicely! I have a bunch more plastic ornaments and I think I finally know what I am going to do with them.  Hope you enjoyed this little project and please don’t forget to follow me – have a crafty day & I will be back soon (wait until you see my Halloween projects - Halloween is definitely one of my most favorite holidays!)

I am entering this in the following challenge:
Anything But a Card - Christmas in July Challenge #24

Friday, July 19, 2013

Shabby Chic Card Won at Unruly PaperArts!

Just a quick note to celebrate my very first internet "win" - I was featured on the Unruly PaperArts blog for my Shabby Chic card - go here to see the post & check out the blog - it is chock FULL of some amazing art, ideas, tutorials, challenges & SO much more.

Here is a picture of the featured card:


Thanks for visiting ~ leave me some blog love and I'll do the same. 
Crafty Dreams,
Christi

Laminate Chip Upcycle Project


This shows the size difference of the laminate chips

At this point, we have all seen the laminate chips you can get from home improvement stores free (or you can purchase them at some smaller independently owned art supply stores).  Those chips are small, about 2 ½” x 1 ¾” – which makes them perfect for key rings, necklaces and a whole slew of other projects.  Well, not only do I have a lifetime supply of the small laminate chips I also have a ton of the larger sample chips – the larger chips are about 5” x 3” – too large to make a key ring or necklace (well, I suppose you could make either out of the large chips, but. . .).  I have had these for ages, and truthfully, I forgot I even had them until I went into the garage and saw the plastic bin marker with “Laminate Chips & Misc.”  I opened the bin and grabbed a bunch of the larger chips and brought them inside, put them on my desk and proceeded to drive myself insane trying to think up for a use for them.  I picked through the chips and found some that were textured and/or a color I wasn’t too fond of.  A few even had some partial writing on them with what appeared to be a thick black permanent marker.  I took four of them and gessoed them with a few coats until you couldn’t tell what color they were and the writing was gone (using thin coats and letting them dry completely between coats – as I still wasn’t sure what I was going to make with them I wasn’t in much of a hurry).  
  
So I had these four large laminate chips all gessoed up with no where to go.  Finally, I thought of an idea – how cute would little art boards be? Something that you can use to display your current favorite ATC or small piece of art work?  I thought they’d be adorable!  I colored them with some Distress Paint (I used Chipped Sapphire, Fired Brick and Mowed Lawn – I kept one just white) spritzed with water, painted some more and let them dry. I protected the chips with a wash of matte gel mixed with water to just ensure the paint I used to decorate the chips wouldn’t rub off or flake.

Now comes the genius part (I know, hard to top my idea, but I think this does) I had been saving pop tops from soda cans and cat food cans.  The little ring inside the part that attaches to the can fit perfectly inside the ring at the top of the chips! I took a picture of what part of the ring I am talking about – sometimes it is too hard to put what you mean into words and a picture really can be worth a million words!


Anyway, I hooked the little ring inside the hole at the top of the chip and figured out that was what I’d use as a hanger. Perfect! That way you can hang them on a push pin that is already on your bulletin board, hook them on a hook (I’m thinking of those heavy duty magnets you can get with the hook on them so you could put the chips on your fridge) or hang them on a nail.  If you use soda can pop tops the hanging opening is smaller so choose the size opening you’ll need based on where you plan on hanging them.  But, even if you use the smaller tab, you can always add ribbon, ornament hooks, unfolded paper clips or whatever to make them so you can hang them anywhere. You really don’t need the little part on the pop tab since you are going to glue them on anyway, but I think it’s a neat trick.  I used E6000 to glue my tabs on, putting the glue on the back of the chip over the hole in the chip and all.  You aren’t going to be able to see it and in the next step, you are going to add even more glue to stabilize it further.

Small binder, or bulldog, clips
OK, I have my hook situation down, what about a hanger of some sort so you can change whatever it is that you have on the chip?  Back to the drawing board again. I thought about paper clips, but I thought that using something like that would make it too easy to tear whatever it is you had displayed; I thought about some magnetic attachment, but then you’d have to make whatever you wanted to hang magnetized in some way, too.  Then I realized that something similar to what is on a clipboard would be perfect! But I didn’t have anything like that in my stash. After mulling the situation over, I decided that the mini bulldog (also known as binder clips) clips would work perfectly!  They are small enough, only about 1 ½” when they are closed, even smaller when they are open.  And I have those; I have a lot of those!  And if you don’t have these you can easily purchase them in any office supply store, I have even seen them at the dollar store.  I took my mini binder clips and glued them on the front using the E6000 again and a craft stick to sort of smear the glue around and level it off a bit.  You aren’t going to see this either so don’t really worry about it.
 
This blob of glue holding the clip also helps to stabilize the pop tab
Since I left the binder clip black for the silver & white chip & I had a blue clip I used on the blue one, I ended up painting some of the mini clips to match the 2 chips I had left.  I first painted them with gesso then with alcohol ink markers, but I should have sanded them first because some of the gesso came off in spots.  I decided to leave them to dry (the alcohol ink) overnight and see if I could save them in the morning.  I didn’t like the way the clips came out so I tried another route to coloring them.  I just pouring some colored alcohol ink and smearing it all over the binder clip with a q-tip. That covered much better than the marker did.  I really didn’t like the red bulldog clip at all, so I trashed it and colored a new one with a gold Krylon Leafing pen.  Much better!  I decide to go with red & gold so I also used the leafing pen to color the pop tab and I edged the chip as well.

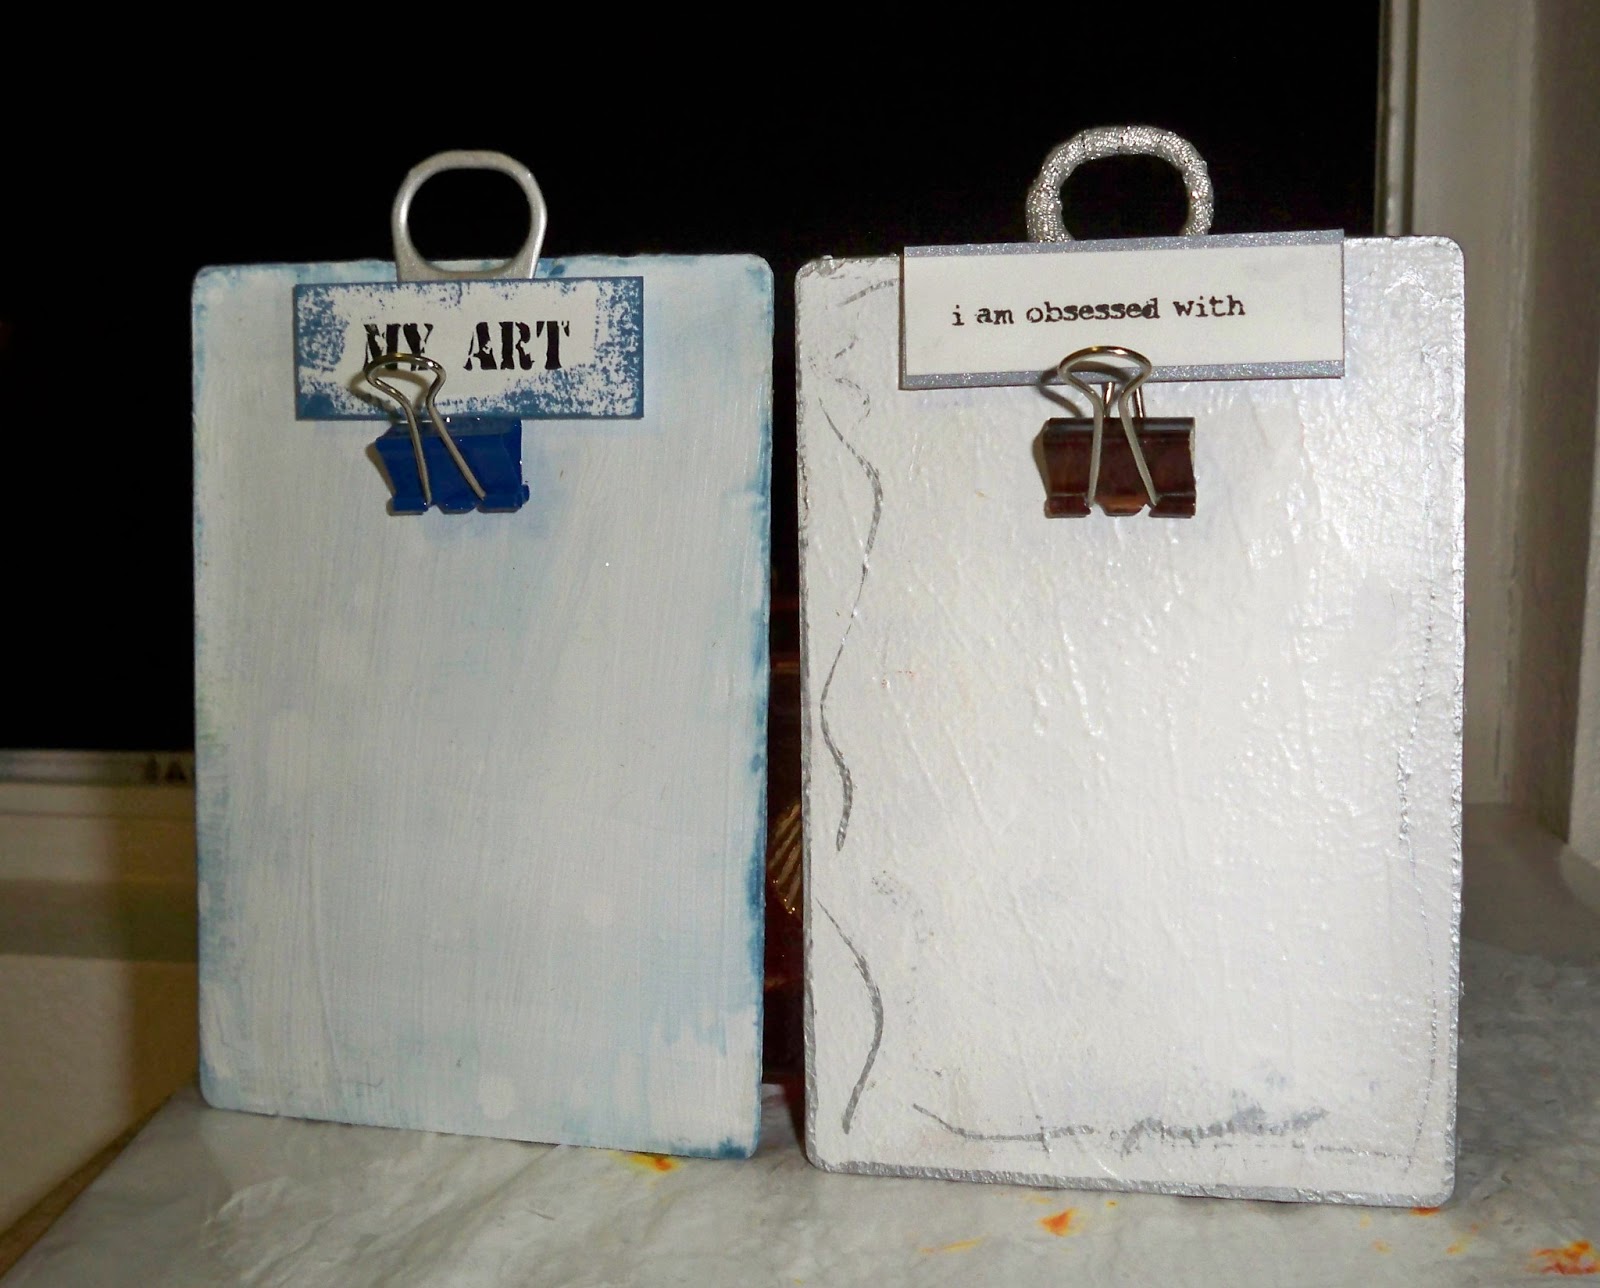
For the little signs, I used Publisher, made them and printed them out but you could just as easily use any word processing program, your own handwriting, cut out letters, stickers or stamp them.  I matted one on silver card stock & the other I edged in Faded Jeans Distress Ink; put one on the blue tile and the other on the silver & white tile. The trick is to attach the signs with pop dots so they go over the blob of glue and where the pop tab and the hole in the tile meet.  Since I used the pop tab “backwards” on the silver & white chip, I finished off the tab by wrapping a sparkly silver ribbon around it and gluing the ends to the back.
Tab on the left is the "wrong" way
I then went through my sticker stash and used some stickers on the red one and the green one – I also think rub-ons would be cool, but the green chip has a texture and I didn’t want to chance messing up any of the others (my track record with rub-ons is not the best.  I even bought a special tool that is supposed to make it so much easier and almost foolproof.  Note the “almost” foolproof).   Once I was done with the stickers I gave the red chip another matte gel & water wash; I left the green chip alone since the stickers are dimensional (the epoxy sticker kind) and I was afraid the wash would cause the stickers to fall off.   Since the backs of the chips were a mess of glue, paint and gesso, I covered them with some patterned paper; being extra careful around where the pop tabs had been glued. I think these are a great upcycle project and they are really cute and useful.    


I have SO many ideas for these large chips now and I know you will be seeing more projects using them in the future. I am finally going to be hitting some tag sales tomorrow & I can’t WAIT – I hope to score some arty stuff. Thanks for reading & looking!
  
I am entering these in the Simon Says Stamp Monday Challenge “Going Green” which features projects using recycled material or projects featuring the color green.  Have a crafty day!


Here is the blue chip at work


Saturday, July 13, 2013

Home May You Find Comfort. . .


I found a bunch of samples of different art boards I had sent away for eons ago.  They were all held together with a long plastic screw (it was similar to a book binding or scrapbooking post – of course, I saved it).  After trimming the parts of the board that were either dented or had writing on it I had this piece left that is about 6 ¼” tall and about 4 ¼” wide. I wanted to make something folksy and colorful – I am having a BLAST using bright colors, which is something I am totally new at.  My décor and clothes consist of basic neutrals – lots of olive green, black, white; pretty boring pallet but after all this experimenting with color who knows what it will inspire me to do! I just got my order of Sizzix dies that I scored during their huge 4rth of July sale and also wanted to play with my new dies so I figured out how I could incorporate it all together. I am fighting a yucky head cold so I hope this tutorial makes sense - LOL.  Here are the products I used:


  • Piece of Foam Board
  • Golden Fluid Acrylic paint in Ultramarine Blue, Cobalt Teal & Titanium White
  • Distress Paints in Wild Honey & Mowed Grass
  • Home May You Find Comfort & Rest sentiment from Wendy Vecchi Homemade Art set
  • A piece of scrap cardboard (I used flimsy all white cardboard – one step thicker than cardstock)
  • Distress Ink in Frayed Burlap
  • Tim Holtz Movers & Shakers Die – Mini Openings
  • Sharpies – Dark Brown and Magenta
  • Ranger Archival Ink in Jet Black
  • Heart Corner Punch from All Night Media (it has a total of 5 little hearts and they bracket your corner)
  • Scrap of Text Paper (I used packaging from a 7 Gypsies product)
  • Piece of Clear Plastic (I used packaging from one of the dies I bought)
  • Scrap of Brown Paper (for the “frame” under the sentiment)
  • Scrap of Red Card Stock (for the Heart Corner Punch)


First, I mixed the ultramarine blue and titanium white together and painted the background to look like the sky.  I painted the board about ¾ of the way down, then used some cobalt teal diluted with titanium white to sort of end the sky; then used my Distress Paint in mowed grass at the very bottom.  I just used the dauber and swiped it across the edge of the board.  For the clouds, I loaded a small paint brush with titanium white only and just kinda dabbed it around to give the clouds some fluffiness.

I then cut out my openings using the Mini Openings die – I knew I wanted the half moon window over the door so I positioned the dies accordingly.  I cut out the square opening on another piece of cardboard to use as the roof and used the window pane die cut separately since I wanted to mount the window onto the “house”.  I cut out the square “house” with the 2 openings in it (it’s about 2 3/8” wide and 2 ¼” tall) and then angled the piece of cardboard with the square cut out for the roof (I just used a ruler – on the other side of the cardstock – and made a triangle so I could be sure the square opening was were I wanted it and that the roof was big enough to fit over the house the way I wanted it).  I painted the house with wild honey Distress Paint and used the direct to paper technique for the roof- just pouncing the frayed burlap on the triangle until I got a pattern I liked.  I heat set both the house and the roof.  I colored the window pane with a magenta Sharpie.
Taking a piece of clear plastic from my stash of packaging I cut out little squares to fit behind the square window in the roof, the half moon window in the house and the window pane die cut.  I stamped the Wendy Vecchi “Home may you find comfort & rest” in Jet Black ink on the back of a piece of 7 Gypsies cardboard that was used in packaging product because I liked the illusion of text under the stamp. I then mounted it on a small piece of brown card stock to frame the sentiment.  I also cut out little squares to fit behind the square window and the window pane.  I took the die cut of the door and colored it with a Sharpie in dark brown. 


Next, I took the clear plastic I had cut out and adhered it to the half moon window, the window pane & the square window.  Using a scrap of white card stock I glued one of the little hearts from the heart corner punch on it, and then glued that onto the plastic I had cut for that window.  Subsequently I took the text background and glued it to the specific clear plastic for the square window and the window pane then glued that to the back of the windows.  I glued the window pane, roof and door to the house.  I set my roof “over” the house, so it sat on the house like a hat.  Adhered the sentiment mounted on the brown card stock to the board. Finally, I took the remaining little hearts from the corner punch on the board where ever I felt they added some splash.

Since this project only uses one stamp I am going to enter it the Simon Says Stamp Challenge “A Little Stamping”.  Thanks for looking and I hope you like my project!

It's kinda quirky, but I like it :)

Sunday, July 7, 2013

Alcohol Ink Postcard


I love Unruly PaperArts and I promised myself I would enter as many challenges as they’d let me.  Well, this month’s challenge is “Postcards off the Edge” – I still have a whole bunch of ideas with that in mind, but one stuck out so far I had to make it today.


This is what I used:

  • 1 piece of Priority Mail box cut to 4 x 6
  • Dylusions by Dyan Reaveley Stamp Set “Say What You Mean”, #DYR34551
  • A whole bunch of alcohol ink background papers – all different colors (I used inks from many different companies to make these backgrounds)
  • The little pad you swipe on the stuff you are gonna emboss so the powder doesn’t stick where it isn’t supposed to
  • Extra Fine Detail Embossing Powder, Black, from Stampin’ Up!
  • Top Boss Embossing Pad


The computer cannot due these justice - they are beautiful if I must say so myself :)


First, I cut 2 x 2 squares out of the background papers.  I tried to look for lighter colors because I wanted to be able to see embossed sayings.  I finally ended up with six squares that I liked.


I then went to my “Say What You Mean” stamp set and chose sentiments that would fit on the squares. I didn’t even look at what they said, if they fit, they were in.


Then I swiped my squares with that anti-embossing powder pad thingie, stamped each square with a sentiment with the embossing ink, sprinkled on the embossing powder and embossed with my kick ass Weller Heat Gun.  I have had this heat gun for 10 years and I LOVE it – It cost a lot of money, but it was SO worth it!


After a slight mishap where my quote literally chipped off my square, I cut a new one and all was good again.  This time the embossing held up fine.


I put them on my 4 x 6 postcard and there! I love this because it is so colorful – and if I am going to do color, you are gonna see it – no mamby pamby color here! OK, I think it’s time for bed. . . 

If I can't decide between pictures, you get them all

I dunno, maybe this one is the best pic so far


 I am entering this fabulous postcard in Unruly PaperArts: RAQ 1 - Postcards from the Edge Challenge and I have a feeling there will be more. . . ;)

What's Cooking?


I haven’t been creating much lately – it is too damn hot here (we have no AC) and my bestest (I tend to make words that fit what I am trying to say - works for me <grin>) sister in the world is here from Florida – in fact, today is her birthday – Happy Birthday Seester – I LOVE YOU!! (99% of my family is born in June & July). 


I saw a few challenges recently for postcards so I figured I’d give it a go.  I cut up an old priority mail box to 4 x 6 then covered it with my tea stained “fabric” (same stuff I used in the “Stars” project here).  I knew I wanted to make something that reminded me of those old Betty Crocker cookbooks – my mom had one – the one with the red and white cover and all the cool retro pictures inside so I dove into my stamps and pulled out these great images that I got from Rubber Baby Buggy Bumpers back when Paula owned the company and had a monthly kit (you can still get some of RBBB stamps at Stamp Francisco).  I think they look 1950ish.  I stamped the men right on the fabric using my trusty Ranger Archival Ink in Jet Black (I swear, this is the BEST black ink ever!) and then I stamped my woman on regular white card stock.  I fussy cut her out and then stamped her again on some yellow card stock, fussy cut out the apron and added that.  I thought the men needed a bit of something so I stamped them again on some olivey (yes another new word!) green card stock and cut out his jacket.  Then I stamped “What’s Cooking?” on kraft card stock with a really old alphabet stamp set that I got from Stampin’ Up! – I liked this alphabet because I thought it looked kinda retro.  I edged my words with Fired Brick Distress Ink.  Then I cut the house out of an eggplant colored card stock using my brand new (don’t you just LOVE brand new toys?!?) Spellbinders Media Mixage Houses One dies.  Glued it all down and here ya go!  Didn’t take long at all (well, fussy cutting the woman took me the longest) and I think I am going to use this in another project eventually.  Hope you like it!


That white spot is not part of the project - LOL