Followers

Friday, October 27, 2017

A Morning Poem. . .

This card's sentiment is definitely one I can relate to; welcome to card #5 for the Cat Lovers' Blog Hop.   This card has caused me the need to vent a bit; unfortunately, the Man is a talker, and has a tendency to blather on and on first thing in the morning about an all manner of things - and I typically have absolutely no idea what he is talking about until I am on my second cup of liquid caffeine.  I often have to ask him questions like, "Did you say there was going to be 30 feet of snow tomorrow?" and he will grudgingly correct me, "No, dear. I said it is going to be in the 70's tomorrow". Well, I've told him a million times not to bombard me first thing and it's not MY fault if he continues to do it! Heck, he will even ask me if I have seen "so and so on the news" ~ HEY! Do my eyes look open?!? Do I look as if I am up to date on things?! I can't even find the remote, never mind actually turn it on! So, it's no shock that this card is a favorite of mine and again, the Katzelkraft Cat has the BEST expression! 

What I Used to Make My Card:
KaiserCraft Square Kraft Card Base, #CD509
Distress Ink in Ground Espresso
Katzelkraft Cats
Sentiment, Riley & Co., Coffee Poem, #RWD-539
Water Color Paper
Water Brush
Derwent Inktense Pencils
Light Brown Card
Lawn Fawn Love You Latte Stamps, #LF704
Spellbinder Nestabilities Labels Forty-One, #S4-468
MISTI
Ranger Archival Ink in Jet Black 
Dimensional Dots

I had my cat already stamped, colored and fussy cut out, all she needed was the right card to put her on and this one totally fit the bill! I used Inktense Pencils and a water brush to color her as well as Jet Black archival ink. She was put on the side to wait to be glued onto the card.  

I made my own background using the MISTI , the Lawn Fawn Love You Latte stamp set and Ground Espresso ink.  I just put the stamps I wanted to use in a
It's NOT crooked in Real Life, just in Photo Life
row, stamped, rotated the stamps one over, stamped and repeated the process until I was satisfied.  Since I knew my kitty would be hanging out in the left hand corner I didn't quite finish the background. To be honest, I didn't think the sentiment would cover so much of the background, but so it is.


I stamped the sentiment {that reads: A poem for mornings ~ Coffee, coffee, coffee. Coffee. Coffee, Coffee. Everyone shut up. Coffee.} on a lighter brown than the Kraft card, cut it out with the Spellbinders die and attached it to the card base with dimensional dots. Lastly, I attached the cat onto the card.  I know how this cat feels as I feel it every. Single. Day.  Could be worse I suppose and I do have to give props to him since he makes the coffee {if only he'd do it silently!}


I hope you got a chuckle out of my card and perhaps it inspired you to enter the Cat Lovers' Blog Hop AND share {and enter} my little giveaway?                               Art~Without~Anxiety

presents
HAPPY HALLOWEEN!
Im having a small drawing on my blog.  All you need to do is click onto this post, chose the costume you like best & when I get 75 costume comments, Ill draw a random winner.  Open Internationally! Please feel free to share!
EXPIRES Nov, 1. 2017

Thank you so much for stopping by - I hope to see you on the giveaway as well as the Cat Lovers' Blog Hop! Fondly, Christi XOXO

In addition to the Cat Lovers' Hop, I am entering my A Morning Poem card in the following challenges:
Simon Says Stamp Wednesday Challenge - Anything Goes
Scrapy Land - #76, Anything Goes w/ a Die Brand they Sell
CCEE Stampers - #1743, Cat Day

Thursday, October 26, 2017

Deck the Halls!

My family might not be the typical family, but one thing we have in common is the love of a good 
laugh, and I KNOW this card will get some chuckles at holiday time.  I figured after all the Halloween projects and cards I've been sharing it was time for a nice break, although I still have so many Halloween cards I'll be ahead of my posting for next year 'cause there is NO way I'm going to be able to blog all of them.  This card is also part of the Cat Lovers' Blog Hop. I sincerely hope you are playing along!


What I Used to Make my Card:
Dark Red Card Base
Tim Holtz Yuletide Paper, #TH93240
Distress Ink in Fired Brick
Distress Marker in Fired Brick
Katzelkraft Cats Set, # KTZ152
Sentiment from Riley & Co., #RWD-472
Spellbinders Nestabilities Curved Rectangle, #S5-006 {on sale $6.99!}
Watercolor Card
Derwent Inktense Pencils
Ranger Archival Ink in Jet Black
MISTI

I love these cats.  The expression on their faces can be used in SO many ways and I can see characteristics of each of my cats in each of the stamps.  I started this card by stamping the cat onto watercolor cardstock with black ink and coloring him {why him? I dunno - looks like a him} with the Derwent Pencils.  I then fussy cut him out and set him aside.

Then I went through my stash of papers and decided upon a background using Tim Holtz' Yuletide collection.  I have found it easier to match a background paper to the card base then vice versa, so I dug into my cardstock stash and found this dark red that fit the bill for my card base brilliantly.  I trimmed down the decorative sheet and attached it to my card base. 

I stamped the sentiment using Fired Brick ink, then cut it out using the Curved Rectangle die.  Using the Fired Brick marker, I edged the sentiment to get rid of those bright white edges.  Lastly, I adhered both the sentiment and the cat to the card.  This is my kind of holiday card - I'm not a huge fan of the mushy ones.

Finally, I want to tell you about a small giveaway I'm having on my blog.  Here are the details:
presents
HAPPY HALLOWEEN!
Im having a small drawing on my blog.  All you need to do is click onto this post, chose the costume you like best & when I get 75 costume comments, Ill draw a random winner.  Open Internationally! Please feel free to share!
EXPIRES Nov, 1. 2017

I hope you find the time to enter and share about my giveaway!  Thanks so much for stopping by, I truly appreciate it! If you decide to follow me, please leave me a note in the comments with your blog info so I can follow you back.  Hugs! Christi

Wednesday, October 25, 2017

Introducing Mr, Mummy, Skelly's Best Bud

Looking for the Cat Lover's Post should be here!

I made this little guy about the same time I made Mr. Skelly {AKA Coffin King}.  His name is Mr. Marvelous Mummy, but he goes by Mr. Mummy.  He was MUCH easier to make than the Coffin King, but I think he looks just as creepy, maybe even more so since he has those scary {or is it scared?} googly eyes.  Now, this is fairly picture heavy since I struggled with how to put into words exactly what and how I was making him.  I also have to say, I recycled that elastic, rubbery, textured self adhering bandage they put on your arm when you give blood or when they are wrapping up an injury.  In fact, unwrapping my arm from a blood test was what inspired me to make this guy! I guess you truly never know. . .

What I Used to Make Mr. Mummy:
Skeleton - Dollar Tree
Spider Webbing - Dollar Tree
Base - Dollar Tree
Elastic Bandage
Dryer Sheets {about 6} - Dollar Tree
Googly Eyes
Adhesive {I used glue dots and standard glue}
Various Inks and Markers 

The hardest part making this mummy is waiting overnight for the fabric sheets to do their thing.  Soaking them makes the fabric softener disintegrate and the sheets are much softer and easy to use. You can notice the difference when you take the sheet out of the dryer, it offers the same effect, except soaking the sheets seems to get more of the softener out of the sheet.  Here is a picture of a used {soaked} sheet vs. a new sheet.


Once the sheets are soaked and dry, cut them up into strips.  I used different widths of strips, mostly because I can't cut straight at all, but, it turned out to be handy.  This picture shows a mound of three sheets, all cut up and ready to go!

While you had been waiting for those sheets to be ready, you should of been wrapping that elastic bandage on your Dollar Tree skeleton {granted, you don't actually need the bandage, so if you don't have any, it's ok.  I used it to give the dryer sheets a good base and so I wouldn't have to wrap the skeleton a thousand times to get some bulk on him.  And, I had it real handy}.  He looks like this when he is all ready for the sheets.  In this picture you can see how I used the bandage and he is next to what the skeletons look like before anything is done to them.


Finally it's time to use the dryer sheets.  I used about six of them, and honestly, I could of used a bunch more.  I really wanted him to be bulkier, but, I grew tired of wrapping him {grin}.  That's all you do with those strips of dryer sheets, wrap, secure, wrap, secure and wrap again.  I used the glue dots in the beginning so I wouldn't have to wait for glue to dry and I found they worked perfectly, making it easier to adhere the strips in different places.  In the picture on the left he is almost finished.  He is all wrapped up and ready to go!  


To color him I used all kinds of black and brown ink and a water brush - the picture shows the Kuretake Clean Color marker in Mid Gray, but I used ALL different colors from the markers, Distress Markers and even Hero Arts ink.  I just kept coloring him until I felt he looked grungy enough to have been hanging out for thousands of years.


I added the googly eyes and then searched for something to make him stand up.  I had bought these little plastic dishes from the Dollar Tree with NOTHING in mind for them, but they turned out to be the perfect thing to attach Mr. Mummy to. Score another find for the Dollar Tree!


 Once he was securely on his base, I added some of this spider webbing, also found at the the Dollar Tree.  In his case I think it looks like fog! That's it! Now Mr. Skelly has a friend to hang out with! Have a very, very safe and Happy Halloween! 

Here is another peek at him.  I love how easy it was to make him - I am thinking of making a whole army of mummies for next year! Maybe even dressing them up, a wedding couple perhaps?
Before I get to my challenges, I'd like to invite you ALL to my little Halloween giveaway: 
presents
HAPPY HALLOWEEN!
Im having a small drawing on my blog.  All you need to do is click onto this post, chose the costume you like best & when I get 75 costume comments, Ill draw a random winner.  Open Internationally! Please feel free to share!
EXPIRES Nov, 1. 2017

I am entering Mr. Mummy in the following challenges:
Altered Eclectics - October Challenge 
Eclectic Ellapu - Dark, Dramatic, Scary
Frilly n Funky - Trick or Treat
Rhedds Creative Spirit - October Challenge, #2 
Cards and More - #196, Halloween
Simon Says Stamp Monday Challenge - Monochrome (hope his coloring works!)
Emerald Creek - Freaky Fun
Simon Says Stamp Wednesday Challenge - Anything Goes

All You Need is Love & a Cat

and a cat. Or six.  I think this stamp is SO cut with the the kitty's glasses and bow tie! I've had it for a
while but {gulp} I actually forgot about it! I'm ashamed! So when I did recall I had him, I had to make it up to him! In order to do that, I put him on a card just in time for the Cat Lovers' Hop!   

What I Used to Make my Card:
White Card Base
KasierCraft Pawfect Cat Collection, PK555 
Meow, Meow, Meow Stamp Set from Unity Stamps, #UK-926A
Watercolor Paper
Derwent  Inktense Pencils
Heart Punch
Red Glitter Paper
Darice Nested Craft Dies, Classic Circles, 2014-74
Ranger Archival Ink in Jet Black

I started by stamping the kitty on water color paper, then coloring him in with Derwent Inktense Pencils.  I didn't like the heart in the language bubble, so I took a very. very old heart shaped punch and made a new heart out of red glitter paper.  I then stamped the sentiment onto white card and cut it out with circle dies.  I fussy cut {argh, I hate it - wish I could sent it all off to someone
who finds joy in fussy cutting!} the main image out and adhered that as well as the sentiment to the background paper.  Lastly, the background paper was glued to the card base, left overnight under my drying tile and we have a card!

Thanks so much for supporting me and the Cat Lovers' Blog Hop!  I have one more tidbit to share with you - I am having a small giveaway on my blog and I would love for you to enter and share:


presents
HAPPY HALLOWEEN!
Im having a small drawing on my blog.  All you need to do is click onto this post, chose the costume you like best & when I get 75 costume comments, Ill draw a random winner.  Open Internationally! Please feel free to share!
EXPIRES Nov, 1. 2017

Thanks for stopping by! Hugs, Christi
In addition to the Cat Lovers' Hop, I am entering my card in the following challenges:
2 Crafty Critter Crazies - M, Anything Goes w/ a Critter
Inky Chicks - #90, Animals

Tuesday, October 24, 2017

I'm too Sexy. . .

I love using kitties for Halloween cards!  This is a fun one, especially when you add googly eyes!  Don't forget to get your cat creations going so you can enter the fabulous Cat Lovers' Blog Hop!
She doesn't look too sexy; she looks terrified! Hehehehehehehehe!
What I Used to Make my Card:
Black Card Base
Sentiment, Riley & Co., RWD-496
Tim Holts/Stampers Anon Crazy Cat Stamps, #CMS251
Tim Holtz/Sizzix Crazy Cats Dies, #661209
Tim Holtz/Stampers Anon Crazy Things Stamps, #CMS237
Tim Holtz/Sizzix Crazy Things Dies, #660953
Water Color Paper
Blender Pen
Derwent Inktense Pencils
Lawn Fawn Starry Skies, #LF1377
Lawn Fawn Blue Skies Dies, LF519
Silver Cardstock
Ranger Archival ink in Jet Black
Distress Ink in Hickory Smoke
Googly Eyes
Dimensional Dots

I had made my cat already - stamped on watercolor paper, colored with Derwent pencils with a blender pen and cut out.  I also stamped, colored and cut the broom and witches hat from the Crazy Things stamps and dies.  I stamped the sentiment from Riley & Company on white card using Ranger Archival Ink in Jet Black and fishtailed the end (see my technique here).  I adhered the sentiment to the top of the card on the left hand side.  I die cut the clouds out of the Lawn Fawn Blue Skies and edged them with Hickory Smoke ink, then set them aside.

I put the witches hat on my nervous kitty, added some comical googly eyes and set her onto the card.  Using silver cardstock, I die cut the Starry Skies die and made a bunch of tiny stars.  I then added the kitty and the broom onto the card. Filling in some of the negative space, I glued the tiny stars all around and then placed the large cloud.  I used dimensional dots to adhere the smaller cloud just to add some interest.  

Now I have got a huge stash of Halloween cards and each year it just gets bigger and bigger, any ideas on what I could do with them all? I'd love to hear your ideas in my comments!

Lastly, I have a small giveaway going on and here are all the details:
presents
HAPPY HALLOWEEN!
Im having a small drawing on my blog.  All you need to do is click onto this post, chose the costume you like best & when I get 75 costume comments, Ill draw a random winner.  Open Internationally! Please feel free to share!
EXPIRES Nov, 1. 2017

Thanks for reading my blog and I hope to see you around blogland! Fondly, Christi

I am entering my I'm Too Sexy card in the following challenges {in addition to the Cat Lovers' Blog Hop} -
Tuesday Throwdown - #366, Spooktacular!
Die Cuttin' Divas - #340, Halloween (pic inspiration)


Monday, October 23, 2017

Feed Me!

I love cats.  I am currently owned by four felines {The Fabulous Feline Four}
and I am obsessed with them.  I can talk about my cats like other people talk about their children. I've been looking forward to this fantastically fun blog hop ALL year! Janis, at Her Peaceful Garden, started this hop a while  ago and it has been wildly successful - I mean who doesn't have any cat stamps?!?! I have a huge amount of cats stamps and every time I see one I like, I might not buy it right away, but it's gonna get bought! Stop by for the next five days and hopefully get a chuckle out of my cats cards; better yet, make your own and enter the hop!

What I Used to Make my Card:
Square White Card Base {5 1/4" x 5 1/4"}
Cheap Alphabet Sets or Letter Stamps
Judikins Purring, Purring Cat, #3395E
Judikins Black Cat, #2725E
My Favorite Things I Knead You Stamps, #BB14
Meow Stamp {manufacturer out of business}
Computer Generated Sentiment
Ranger Archival Ink in Jet Black
Hero Arts Ink in Cup 'o Joe
MISTI 


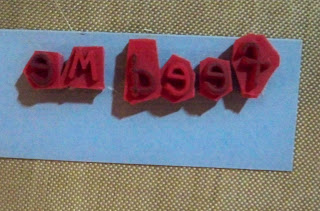
This was a super easy card to make.  I started by stamping the two cats on the square card using the jet black ink; I have removed the 2 cat stamps from the wood blocks because it was very difficult to get a good, solid image and now I can stamp them over and over with the MISTI until they are nice and black.  Then I set to work making my own stamps.  It isn't difficult and if you have no alphabet sets you can sometimes pick them up for a dollar at the major chain stores.  I have quite a few old alphabet sets, and they are all wood mounted.  I was a die hard "mount your
stamp on wood" stamper; until I saw how much more economical it was to buy them unmounted, and now it's  cheaper to buy the clear stamps. Anyway, if you have designated a few alphabet stamp sets you don't mind using {you're going to have to ruin them, if you consider un-mounting them ruining them}, just peel the letters off the adhesive; and off the wood if they are mounted.  Then you are free to make your own words.  All I did was adhere my chosen letters to a piece of cardstock, then I used the MISTI, attaching the stamp with a bit of non-permanent adhesive roll tape {the kind that comes out of the dispenser}.  So easy and I am happy I thought of a way to recycle those teeny tiny letter stamps. You can just reuse them by taking them off the card stock. The red letters I used in this project actually came with something or other to attach them to so you could make your own words and sentences.  It didn't work, so I threw out the thingamajig, took the adhesive off the back and viola! I have custom words!  

So, I had my card with the two black kitties on it, I computer generated my sentiment {which reads "When you have been gone for a while and your cat greets you like this:" the meows are stamped, then the second half reads: "They are really saying this:" then feed me is stamped}, colored the cardstock with the Hero Arts Ink, very lightly.  I then stamped the fish around the bottom part of the card using the same Hero Arts ink.  The meow stamp was stamped at an angle.  I then used adhesive dimensional dots to put the sentiment onto the card.  The whole process was very easy and so much fun.  I love it when my cats are sarcastic and snarky {they learn from the best!}.

Before I close, let me invite you to enter a little giveaway I'm having:


HAPPY HALLOWEEN!
Im having a small drawing on my blog.  All you need to do is click onto this post, chose the costume you like best & when I get 75 costume comments (or on Nov. 1, whichever comes first), Ill draw a random winner.  Open Internationally! Please feel free to share!

EXPIRES Nov. 1, 2017

Thanks SO much for stopping by! Hope to see you at the Cat Lovers' Blog Hop 2017and don't forget to share my little giveaway! Hugs, Christi

I am entering my card in the following challenges, besides the Blog Hop:
SUYP - #23, M, Anything Goes of Meow-lew-ween 
Southern Girls Challenge - Crazy for Critters

Saturday, October 21, 2017

Dies R Us - Magical Halloween

Hi all! I hope things are going well for you! This is a cute Halloween card that looks complicated but was easy to make with a few dies.  I hope this inspires you to take a look at the Dies R Us Inspiration Blog, there is a new creation to inspire you every day!  Here is my Magical Halloween card:


What I Used to Make my Card:
White Card Base
Die-Versions Whispers Creepy Gate, #DV-692
Die-Versions Sweet Petites, House with Chimney, #DVP-049
Lawn Fawn Costume Party Dies, #LF1459
Lawn Fawn Lawn Cuts Craft Border Die, Stitched Tree, #LF1236
WOW! Primary Ebony Super Fine Embossing Powder, #WHOOSF
Fence from Silhouette Cameo
Embossing Ink
Mottled Blue Cardstock
Brown, Orange & White card
Watercolor Paper
Blender Pen
Pop Dots


I had already colored and cut the cuties from Costume Party so all I had to do was make the background for this card. The sky is made from a mottled blue card.  I've had this cardstock for at least ten years! I often think to get rid of it, but then I come up with another card that needs a sky and I dig it out again.


As you can see, I edited the creepy gate a bit, cutting the ends and the birds to help it fit on the card better.  I cut the fence using my Silhouette Cameo and I matched it with the gate the best I could.

I had originally cut the house out of beige card, but you could barely see it (it melted into the background), so I decided orange would give the house some presence and it IS a Halloween card.  This cute little house has smoke
coming out of the chimney, which will be SO cool in the winter, but, once I put the house on the hill, the smoke was too "high", so I trimmed it off.

Once I put the background together, I added the Costume Party characters, complete with a pumpkin bucket to collect all the candy.  I hope when they finally get to the house on the hill they get lots of candy 'cause it looks pretty spooky to me!  To add a bit more interest, I used dimensional dots on  the unicorn; he sticks out a bit more than his two trick or treating friends.  He should; after all, he has the candy bucket!

I have a small giveaway going on! Just go to this post, and comment on which costume you like the best.  Open internationally and on going until I get 75 entries or November 1, 2017, whichever comes first.  

Thank you so much for checking out my latest creation! I hope you will join us on the Dies R Us Inspiration Blog and then perhaps you'll take the time to whip up a project and you'll enter into the Challenge on the Dies R Us Challenge Blog.  Hope to see you there! Fondly, Christi

Don't forget to play along at the Dies R Us Challenge Blog for your chance to win a gift voucher to the Dies R Us Store.  A new challenge begins on the first and fifteenth of every month.  
Be sure to Follow Us on FACEBOOK too. 

click below for:

I'm entering my Magical Halloween Card in the following challenges:
My Time to Craft - Halloween/Cats
Heartful Stamping - Anything Goes & a Stamp
Classic Design Team Challenge Blog - Anything Goes (DT Creations Only)
Emerald Creek - Freaky Fun
Pink & Main - #26, Halloween/Fall
Paradise of Stamps - #59, Autumn/Halloween
The Rubber Buggy Challenge - #4, Autumn and/or Halloween
Aud Sentiments - #191, A Sentiment & Halloween
Allsorts - #438, Halloween
Simon Says Stamp Wednesday Challenge - Mood Board

Thursday, October 19, 2017

Coffin King ~ Mr. Skelly

I get tons of inspiration from wandering around my local Dollar Tree, especially during this time of year.  I have been buying up the skeleton garland that they sell.  It's made up of four skeletons, 6 inches tall, attached to each other with burlap twine.  This year I also found some coffin shaped boxes and they had them in two sizes! I bought up a bunch of them since you never know if the store will get more stock, or ever carry them again.  Now, this is a fairly long post, so settle in!


What I Used to Make my Coffin King:
Coffin Box - Dollar Tree
Skeleton - Dollar Tree
Spanish Moss - Dollar Tree
Tim Holtz/Stampers Anonymous Simple Sayings, #CMS155
Ranger Archival Ink in Jet Black
Distress Ink in Tones of Brown
White Card  for Banner
Banner Cut from Silhouette Cameo
Tim Holtz/Ideology Skulls
Tim Holtz/Ideology Boneyard Bones
Tim Holtz/Ideology Wishbones
Tim Holtz/Ideology Pumpkin Pieces
Tim Holtz/Ideology Brooms
Tim Holtz/Ideology Spider Charm
Krylon Leafing Pen in Silver
Gesso

Everything else is from my stash:
Dresden, Jewelry Dangle, Gems, Masking Tape, Brads, Plastic Cats, Iridescent Black Enamel Dots, Wooden Letters, White Silk Fabric Scrap and the Checkered Black & Orange Ribbon.
Color the Tape

Before I get into the making of the actual design, I wanted to share how I made the hinges.  They aren't a huge part of this piece, but I think something like this can come in handy when looking for an unusual little something for your project or card.

How I Made the Hinges: I initially wanted to be able to open and close the coffin, but, after designing the piece, it became obvious that keeping the coffin open all the time was a better way to go.  I am proud of the hinges, so I decided to do a tutorial on how I made them.  First step is putting a strip of masking tape onto some cardstock and coloring it.  I used all kinds of brown inks to color this tape and I didn't write down exactly which ones I used (sorry!) but I did use Distress Inks in tones of brown.  As soon as the ink is dry on the tape, scrunch it up to give it the cracks like you'd find on real leather that's rather old.


I then cut the tape into strips.  The tape may naturally start to separate from the cardstock, which is perfect, since you want to have the tape be pliable.  If you have to, just grab a corner of the cardstock and pull it.  This will leave a nice backing on the tape.  Then take a nice dark brown ink and edge the strips.  This will remove any of the stark white that is left from the cardstock.  You can refer to the picture above where I laid out the basic steps.  You can also make this leather-look for a fabulous background - just don't cut the tape into strips!  Another technique is covering a piece of cardstock with ripped pieces of masking tape, then coloring it with inks to make it look like leather.  The last thing I did with the hinges was glue on some small black brads and then attached them to the painted coffin.

How I Made the Coffin King:


First, I roughly sanded the coffin since it had that shiny coating on it. After coating the coffin with gesso and having the coffin dry, I  painted it with black acrylic paint, dry brushing some brown around the outside to make it look like wood. I repeated the steps with the inside of the coffin but just used the black paint.  While the coffin was drying, I worked on the skeleton.  I glued some black gems into his eye sockets, sized his crown out of Dresden, and went into my stash for his cape.  I had gotten some fabric books from a furniture store (and some great wall paper books) filled with fabrics and patterns they no longer offered and that's where I
found his cape.  It was already cut with pinking shears  on one side, so that was perfect for the part of his cape that wrapped around his neck.  All I did was use a rubber band to keep the cape's shape and placement while the glue was drying.  I literally wrapped it around his neck but no worries since he'd already seen better days!  I colored the Dresden with a silver leafing pen (it was originally gold colored) and glued that onto his head.  Lastly, I made his staff (scepter?) out of an old jewelry 
dangle I had lying about; I colored it silver with the leafing pen and glued a clear gemstone to the top.  I adhered that to his left hand.  Every king needs a

staff; preferably both kinds {wink.}

Setting the skeleton aside, the coffin was dry so I filled the bottom with some Spanish moss.  That was one of the messiest parts, having never dealt with moss before I had NO idea that it would get everywhere.  It did.  And my four fabulous felines would have loved to help me clean it up, but I did it myself knowing they'd also be throwing it up for days!  Once the moss was dry, I set Mr. Skelly onto the moss and let him settle in.

Meanwhile, I decided what I was going to use to decorate the 
inside of the coffin lid.  I used a bunch of Tim Holtz' new and old Idea-ology products, as well as a bunch from my stash.  Here are some close ups of the coffin lid {remember if you want to see these pictures bigger, just right click on them with your mouse}.


I had both the small Scrabble-like tiles and the grey kitten in my stash.  You can also see one of the iridescent black dots.


This cute little black kitty was also a stash item.  She resides at the top of the coffin, atop the banner that reads Happy Halloween.


In this picture of the bottom of the coffin you can see Mr. Skelly standing on one of Tim's pumpkins, and along side him is an Idea-ology skull, spider and broom.  This is also a good picture of the hinges.  Above and next to the broom is where the wishbone and boneyard bone are intertwined.


Here is another look at the finished product.  I always make at least one 3D Halloween project.  This year has been a bit busier than usual for me but, who knows? Halloween isn't here yet!
I hope you enjoyed my tutorial.  Have you made anything 3D for Halloween or the upcoming holiday?  I have SO many ideas for ornaments I have to start writing them down; I can't sleep through all the noise my brain makes putting them together in my head!

I also wanted to mention a small giveaway I am having on my blog:
presents
HAPPY HALLOWEEN!
Im having a small drawing on my blog.  All you need to do is click onto this post, chose the costume you like best & when I get 75 costume comments, Ill draw a random winner.  Open Internationally! Please feel free to share!
EXPIRES Nov, 1. 2017

Thanks for reading this far down; I know it was a long post! Hope to see you at my giveaway! Happy Halloween! Christi
I am thrilled to add Coffin King to the following challenges:
Altered Eclectics - Oct. Challenge, Anything Goes
Frilly & Funkie - 'Tis Near Halloween (#2)
Rhedd's Creative Spirit - Oct. Challenge
Craft-DeeBowz - Anything Goes w/ Handmade Bow
Eclectic Ellapu - Oct. Challenge, Dark/Scary 
Naughty or Nice - #44, Something Spooky
An Inky Mess - #14, Just For Fun